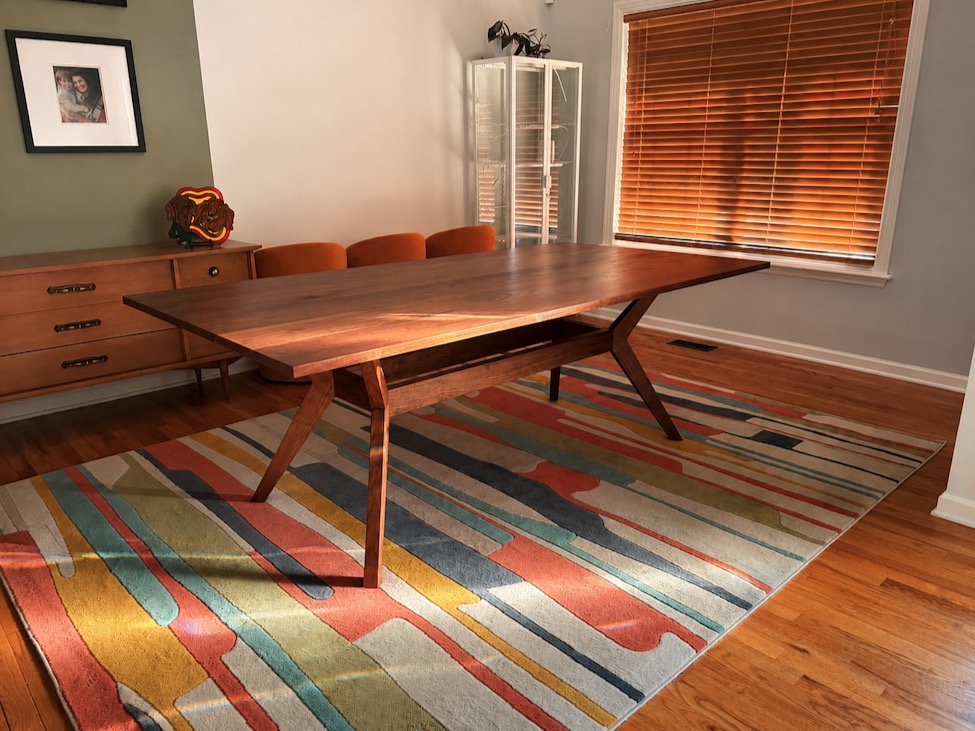
I build a custom solid-walnut mid-century modern dining table for friends, working through tricky angled joinery, a few setbacks, and the real economics of why a $10,000 table is a bargain at $2,500.
How much would you charge for a solid walnut dining table like this? My estimate is about $10,000. I only charged my friends $2,500. That sounds like bad business, but there’s a reason I can make it work.
Where Does $10,000 Come From?
Walnut is expensive right now. Here in the St. Louis area, good 8/4 walnut can run as much as $15 per board foot. The lumber for this table alone came to roughly $2,500. And you have to factor in the time investment. Between designing, prototyping, milling, building, sanding, finishing, and delivery, I estimate I have about 125 hours in the table.
Subtract $2,500 in materials from a $10,000 selling price and that leaves $7,500, or about $60 an hour before overhead, taxes, tools, insurance, and all the other costs of running a business. At a much more reasonable shop rate of $125 an hour, this table would be closer to $18,000.
That’s one of the many reasons I have a lot of respect for career custom furniture makers. Making one-off furniture for a living isn’t easy. Fortunately, I make my living teaching woodworking. My friends could cover the materials while I turned the project into videos and a full woodworking course. If you want step-by-step build videos, plans, templates, a SketchUp file, and a cut list for this Splayed Leg Mid Century Modern Table, check out my course in The Wood Whisperer Guild.
Designing the Base
My friends gave me a simple brief: walnut, angled legs, and a mid-century modern feel. The rest was up to me. I started with a rough SketchUp model, then worked out the important dimensions and angles full-size on paper. I go deeper into that process here: This Old-School Drawing Method Can Save Your Build
In SketchUp, I realized there was a problem I needed to design around. The legs splay outward at 45 degrees, so the legs and long rails meet at 22.5-degree bevels. That geometry left extra material sticking out from the rail. Rather than bevel the entire rail, I made a full-size prototype and found a better solution: cut deeper into the leg and create a tapered bevel that fades away. A geometry problem turned into one of my favorite details on the table.
Building the Base
Each leg is made from two pieces joined with six 3/8-inch dowels. I used epoxy for the extra working time, which turned out to be useful when I discovered my first set of dowel holes wasn’t deep enough. The legs also required mirrored 22.5-degree cuts, so I made a double-ended table saw sled. Two legs register from one side and two from the other, while the blade and fence stay in the same position.
I planned to use dowels for the long rail joinery too, but my jig didn’t register well on the angled surface. So I switched to Dominos. Once you leave the world of straight and square, you start finding the limits of your favorite joinery systems pretty quickly.
Clamping Odd Angles
The legs also required some unusual clamping. I used sandpaper-lined cauls that give the clamps a square surface to push against while directing pressure into the angled joint. If you haven’t made a set, I show the idea here: Cool Miter Clamping Trick – You’ll Want to Make This!
Even with all that planning, the final glue-up went sideways. The double-stick tape holding the cauls let go, then some support blocks popped off. Eventually I abandoned the elegant plan and put clamps wherever they would close the joint. It wasn’t pretty, but it worked.
Building the Walnut Top
Board selection really matters on a top this large. After milling the lumber, two boards stood out for the wrong reasons, so I went back for replacements. I hated spending more money on walnut, but this table should last for generations. I glued the top with Titebond Dark and used Dominos for alignment. Looking for a TWW Glue Roller? Once it was cleaned up, I added a large under-bevel around the perimeter. That keeps the strength of a thick top while making it look much lighter.
Finishing and Protection
The main finish is Natura OneCoat. My friends wanted the low-luster look of a hardwax oil and liked the fact that it can be repaired. After that cured, I added Carbon Method Ceramic Nanofinish for another layer of protection. It goes over an existing cured finish and adds a very thin wear layer without making the surface look like it’s coated in plastic.
The top and base required separate trips, but once everything was assembled in the house, the project finally came together. My friends got a beautiful solid walnut dining table that should serve their family for decades. I got to tackle one of the more complicated table designs I’ve built and turn the process into a teaching project. Everyone wins.
How much would you charge for a table like this? My estimate is $10,000, but I only charged my friends $2,500. Allow me to explain.
Walnut is expensive right now. Here in the St. Louis area, good 8/4 stock can run as much as $15 a board foot, and the wood for this table came to roughly $2,500. And this table took me approximately 125 hours to build. Here’s how that breaks down.
Design, drawings, and material planning: 20 hours. Prototypes, test joints, and problem-solving: 20 hours. Lumber selection and milling: 10 hours. Building the base: 40 hours. Building the top: 15 hours. Sanding, detailing, and finishing: 15 hours. Delivery, setup, and related handling: 5 hours. That’s 125 hours total.
So at $10,000, subtracting $2,500 for materials, that comes out to a shop rate of $60 an hour. And once you account for overhead, taxes, and all the unpaid work that comes with running a custom furniture business, $60 an hour is pretty modest. At a more reasonable professional shop rate of, let’s say, $125 an hour, this table would be closer to 18 grand!
With numbers like that, you can clearly see why I make videos and write books for a living. But I’d be curious to hear from you guys. After you watch the video, let me know how much you think you’d need to charge for a table like this in order to make a decent profit.
Anyway, I can make an arrangement like this work with my friends because the build supports the teaching side of my business. In fact, I filmed a separate, step-by-step Guild course that you can check out at thewoodwhispererguild.com. But the video you’re watching right now has a different job. I wanna show you how this idea developed and the problems I ran into along the way. And with any luck, you’ll learn something too. So let’s get started.
I knew my friends wanted angled legs, a mid-century modern vibe, and walnut. But the final execution was left to me.
So I started by roughing out some legs and a top in SketchUp. The scale was completely off when I did this, but I didn’t care. I just wanted to get the shape out of my head and into a visual space. I then took this weirdly undersized and oddly proportioned rough sketch and threw a bit of a Hail Mary by asking AI to make a realistic rendition in walnut.
It did a surprisingly good job, and this was just what I needed to get the final sign-off on the design from my friends. Now to make it a reality.
As you saw before, I’m a bit of a bull in a china shop when it comes to SketchUp, so I’m working out the details at full size on paper. Old school, baby! I actually have a whole video showing this full-sized drawing process that you might want to check out, but once I had the angles and shape I liked, I was able to take that information back to SketchUp to make a fairly accurate representation of the legs.
As I began sketching in the rails, I noticed a problem. The leg and the rail will each be cut at 22.5 degrees so that the leg ultimately kicks out to 45. But the way the geometry works out, it leaves this extra material here on the rails. Of course I can just bevel the rail all the way down, but I don’t particularly like the way that looks.
SketchUp has served me well by showing me something my brain would NOT have seen coming, but in order to solve this problem, I think I need some wood in my hands. So back in the shop I slapped some 2x4 scrap together to make an IRL version of the leg.
I used the shapes in SketchUp to knock out a quick set of templates, and that makes it pretty easy to shape the legs. I’ll quickly make the 22.5-degree cuts, and now we can observe what we saw in SketchUp with that extra material on the rail. And this is when I had the aha moment.
If I cut into the leg a little deeper, we can leave the rail untouched and instead take the material from the legs. And especially if we do something like a tapered bevel, we can have a cool visual feature and solve our problem at the same time. Kinda makes me wonder how many cool design ideas we see out there that are really just creative problem solving.
So now, armed with a proof of concept and a heavy dose of misplaced confidence, I started working on the actual legs.
Each leg is made from two pieces and ideally, we want to make sure the two parts come from the same section of a board. That’ll keep the grain and color fairly consistent.
A lot of times I’ll use a flush trim bit to shape parts like this, but I’ve seen my buddy Phil Morley use an L-fence a lot in the past, so I figured I’d give it a shot. This process is pretty cool because it’s quite a bit more efficient for straight cuts like this and works incredibly well. Unfortunately, because I was being cautious and going slow, I did get a little burning, but we’ll be able to clean that up with a plane.
So to join the legs, I’m actually going with dowels. I considered Dominos, but the width gets me a little too close to the edges. Using a doweling jig, I can actually fit six 3/8-inch dowels across this joint, making it incredibly strong. How strong? I have no idea. But strong enough.
I want a little extra working time here, so I use epoxy as the glue. To clamp the joint, I use sandpaper-lined cauls. I actually have a video about making these that you might be interested in, but I highly recommend keeping at least four of these in your shop for clamping oddball angles.
Now you want to see me be a cotton-headed ninny muggins? This is when I realized that I never checked the depth of my dowel holes and it looks like they’re bottoming out. So I need to move fast. I pull the joint apart and run to the bandsaw to cut off about 1/8 inch. I’m feeling really good about my choice to use epoxy at this point. Thankfully, I only drilled one of my legs so far, so I can drill deeper on the rest.
Next I can cut that 22.5-degree bevel. I’m going to make a little double-ended sled for the table saw. The part that almost broke my brain was that there are two mirror images here. So two legs are cut positioned at the front of the sled and two will be cut positioned at the back of the sled. This eliminates a lot of variables as the blade and fence position stay the same and the only thing that moves is the orientation of the leg.
After this whole leg rigamarole, it’s kinda nice making a simple straight rail. Of course the ends need that same 22.5-degree bevel, and there’s no better tool for that than the miter saw.
To join the legs to the rail, my plan was to use more dowels. But when I tried to position my jig onto the beveled surface, I couldn’t see how to make it work. DowelMax makes a 45-degree fence for miters and bevels, but this is 22.5 degrees. I’d love to hear from experienced DowelMax users how you might tackle this joint.
I really like to try to use the same joinery system throughout a single project, but I didn’t anticipate that little speed bump with the dowels, so I quickly pivoted to the Domino. If you want to find weaknesses in a joinery system, start building stuff with curves and odd angles.
Remember that tapered bevel I mentioned before on the legs? It’s time to make them. If I were planning on making this table more than once, I’d probably come up with a more efficient way to make these shapes, but for this one-off, hand planes will do the trick.
I showed a bit of this process a few months ago on social media and kept getting the same two questions. So why the block plane? Because it’s sharp and agile. I can remove a lot of stock in a hurry and the plane is small enough that I can still see my guidelines as I work.
And why do I hold the plane at an angle? Well, generally speaking, a skewed blade cuts easier and smoother than taking the pass head-on. So it’s just kind of a habit at this point.
Once I get pretty close to my lines, I’ll switch up to a larger jack plane to get this new beveled edge smooth and flat. I realize the video may be playing tricks on your eyes, but hopefully you can see how the bevel resolves perfectly with the rail. It’s one of those things where if you didn’t see me make it, you might have a tough time visualizing what the heck you’re looking at.
The short rails don’t have a lot going on, other than we need to find a good way to join them to the long rails. For that I’ll go back to dowels. If you think about it, dowels give you a good bang for the buck in terms of joint real estate while leaving as much of the original wood intact as possible. That’s why I think they’re a good choice here where we’re essentially bringing three separate pieces together into one very small space.
With the help of my beautiful assistant, I can get this thing dry assembled and work out a clamping strategy. This also gives me a chance to mock up the top. When it comes to tables, it’s always a good idea to have something you can actually sit at to check things like overhangs and leg clearance. This one passes the test, so we can start the glue-up.
The rails come together first, essentially making a big box. I’m just using regular Titebond Original at this point. It’s the GOAT for interior furniture and this glue-up should be quick.
By the way, here’s some of the amazing commentary you’re missing out on by not purchasing this full course.
Another quick dry assembly and I can measure for the upper braces. But first, a stability test. Looks like it’s pretty sturdy. And if it wasn’t, I’d at least have some great content for social media.
The upper braces get mitered on each end and the pieces need to be pretty large to span the legs. Much of that material gets cut away later. A few Dominos and then another dry assembly. Now I can mark the cut lines.
The two bevel cuts I need to make will effectively turn this piece into a trapezoid. To make this first cut safer, I’ll attach a complementary angle block. That’ll allow me to use my push stick.
The second cut is where things get a bit dicey. The key is to make sure the push stick is placed right above the area that makes contact with the table. If I move it too far to the left, the piece will tip into the blade. I’d be very happy if you guys can suggest ways you might make this cut a little safer.
One last dry assembly to confirm that the upper brace fits, and now we drill for screws that will hold the top in place. The first hole is a counterbore for the screw head. The second hole is actually two side-by-side holes that essentially make a slot to accommodate any future movement in the top.
And now it’s time for the final assembly. At this point, I had no idea what I was in for. All this planning. All these dry assemblies. All these fancy cauls. In the end, it didn’t matter because things went to hell in a hand basket.
I used double-stick tape to attach the cauls. Double-stick tape can work as long as you don’t apply too much lateral pressure. But I underestimated how much pressure I’d need, so the tape didn’t hold.
Quick Spag thinking, I grabbed the hot glue gun and reattached the cauls, only to have the little support blocks that were held on with CA glue pop off. Thankfully I used epoxy for this assembly, so I didn’t completely freak out.
I decided that all I needed to do was throw a long clamp across the top of the legs and that would close the joints well enough. It wasn’t my best moment, but I got the job done.
The next day I had quite a bit of cleanup to do. Nothing a blow dryer, a pry bar, and some backside sandpaper can’t handle.
Alright, with that debacle behind me, I was able to start on the top. Now before anyone cries foul about the gloves, this is one of the very few times you’ll see me use them. Big heavy pieces like these can be tough to move around and the gloves give me a nice grip. So I take the calculated risk. As the pieces get thinner and lighter, I’ll lose the gloves. Obviously, I generally advise against using gloves around power tools, but there are times I make an exception.
So I’m trying to keep any sapwood facing the bottom. But unfortunately, after cleaning up the faces, we have two boards that are not getting with the program. One has a substantial knot and the other has some feathery crotch grain, and neither one fits the look of the rest of the top. So as much as I hate to do it, it’s back to the store for a couple more boards.
Considering this is a lifetime dining table that my friends will likely pass down to their son at some point, it’s probably worth the extra time and expense to make this top look as good as it can.
For the glue-up, I’m going with Titebond Dark. If you work with dark woods, this is probably a glue you want in your cabinet. It really can help that glue line disappear where white glues can make joints look a little more obvious.
And I don’t think I’ve mentioned it before, but we now sell some bad-ass heavy-duty Wood Whisperer glue rollers that you might want to check out. You can find them at TWWStore.com.
A glue-up like this can be a real challenge if you’re doing it by yourself. I bring in one board at a time, trying to seat each board fully before adding the next. And when the work requires it, you do what you have to do.
Once it’s ready for final clamping, I let one side overhang the edge of the assembly table and add a clamp underneath. I can then lift the end so the clamp is on the table. That gives me room to start sliding clamps underneath the top. I like to have clamps on both the top and the bottom to help balance the pressure. I find it helps promote flatness in the final top.
So now it’s time for lots and lots of sanding. This is why I really like using Dominos for alignment. It keeps the boards pretty level and prevents me from spending a bunch of time sanding the joints.
Flipping this thing isn’t easy, so I need to bring in the real muscle. And this is where the Bench Nuts really start to earn their keep, as the freshly sanded surface now faces down while I work on the underside.
Even though this is the bottom, I have a couple of knots that I’d like to fill, just to stabilize them and make the surface smooth. And I can trim to final length.
My friends were really excited about having a nice under-bevel on this thing, so let’s add one. An under-bevel is a nice way to give a top a slightly thinner appearance while maintaining the rigidity of a beefier thickness. And honestly, they’re pretty fun to make.
I use a handheld planer to do most of the work. Once I feel like the planer might do more harm than good, I’ll switch to hand planes. And the only guides I have here are the lines I drew. As long as I don’t go over the lines, I should have a nice even and clean bevel.
With the underside facing up, now’s a good time to apply some finish. Normally I’d work on the top surface first, but I really don’t want to flip this thing any more than is necessary.
Finish of choice? You guessed it. Natura OneCoat. My friends want that low-lustre hardwax oil look that’s super popular these days and they value repairability. So this stuff fits the bill.
On a big surface like this, you can definitely apply the finish with sanders and buffers. I’ll do that on the show face later, but on the bottom I’m showing how you can do it manually. Your wrists will get tired, but it’s not that bad. Now’s a good time to apply finish to the base as well.
Once dry, I can bring the base over to the top and get everything lined up so I can locate the screws. It’s pretty awkward drilling at this angle and I can’t find my little right-angle drill. So I’ll do this the hard way.
Before flipping this thing for the final time, I’ll give it a little maker’s mark. Burn baby, burn! There’s muscle mamma again.
So now I can add my roundovers and sand through the grits on the top. For this face, I’ll use some power tools. Definitely makes the job faster and less fatiguing. That’s looking pretty good. But can it look even better?!
My friends requested just a little more protection for their top, so I’m going the extra mile by applying some of Carbon Method’s Nanofinish. It’s a ceramic topcoat that goes over the existing finish and cures into an ultra-thin, hard wear layer. It adds a small amount of additional sheen while helping protect the surface from water, oils, heat, and common household chemicals.
I’ve only applied this stuff on one other project, and it’s my own dining table at home. So I know it works pretty well, but I’m going to take my time with the application just to refresh my memory. Thankfully, it’s mostly a wipe-on, let sit, then wipe-off sort of application. You can find out more at CarbonMethod.com.
So after everything has some time to cure, it’s finally delivery day. I had to make two trips, one for the top and one for the base. Those Bench Nuts came in handy again as standoffs that prevent the straps and ratchets from damaging the fresh finish.
On location, I was able to drive the screws to secure the top, and this bad boy is ready for a lifetime of service.
My friends couldn’t be happier with the result. They got a great deal on a table, and I got to make something I’m proud of that I can use as a teaching tool for other woodworkers.
Everyone wins.
If you enjoyed this video, I’d appreciate you clicking the like button, subscribing, and leaving a comment. That lets YouTube know you’d like to see more videos like this, and we really appreciate your support.
Comments
S
Scott "Botch" Boettcher
on 10/29/2026 at 09:59 PM
Beautiful table and great video, Marc!A quick point about the base glue-up: epoxy joints actually need just a bit of “thickness” in the glue-line (if they’re spread too thin it actually weakens the joint), so you don’t need to torque down quite so hard on the clamps (obviously you want the joint to not show any visible gaps, but your joints came together nicely. That may help in any Euclidian joints you glue up in the future!
M
Mel Johansen
on 11/02/2026 at 11:57 AM
The best table I have ever seen. I have followed you for years and enjoyed your work and teaching. I was sorry you left Phoenix.
S
S.G
on 11/03/2026 at 09:38 PM
Looks great. Im always impressed with how well your works comes out.